In the digital age, technology continues to push the boundaries of creative expression. One such fascinating innovation is AI voice cloning, a powerful tool that enables you to clone any voice and create remarkable song covers. In this tutorial, we’ll guide you through the process of using AI voice cloning to recreate vocals and craft captivating song covers. By leveraging the capabilities of AI and machine learning, you’ll be amazed at the results you can achieve.
Prerequisites: Separating Vocals and Background Music
Before we dive into the AI voice cloning process, you’ll need to select a song you want to recreate. To get started, follow these steps:
1. Choose your desired song and separate the vocal track from the background music. You can use the website x-minus.pro to easily extract the vocal and background components of the song or you can also use python script to separate the vocal track from instruments.
Step by Step Tutorial
Step 1: Setting Up Google Colab
Google Colab provides a powerful and convenient platform for running Python code, particularly when working with AI models. Follow these steps to set up your environment:
Create a free Google account if you don’t already have one and open the the Google Colab file [Google Colab AI Voice Cloning File]
Step 2: Selecting and Configuring the Voice Model
To begin the voice cloning process, you’ll need to choose a pre-trained voice model. Follow these steps:
a. Open the [Voice Model Selection Sheet] and select a model that you want to clone
b. Copy the selected model’s name from the sheet.
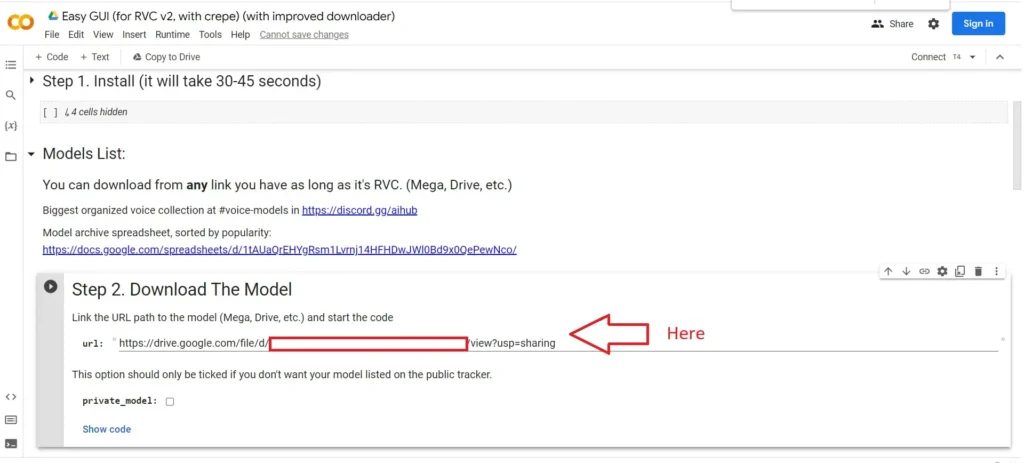
c. Paste the copied model name in Step 2 of the Google Colab file (See below screenshot)
Step 3: Upload the Vocals in Google Collab environment
Upload the mp3 file of vocal that we created in pre-requisites on google collab environment
Step 4: Running the Google Colab Code
Now that you’ve configured your voice model, let’s proceed with running the code in Google Colab:
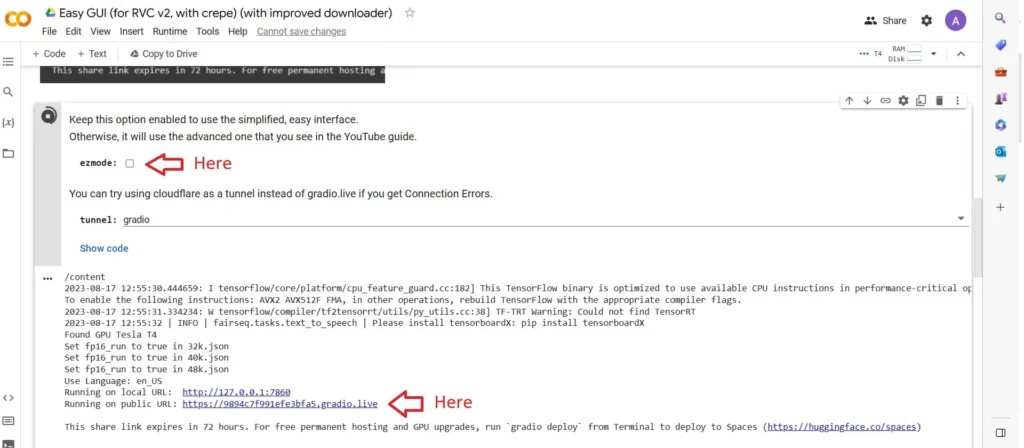
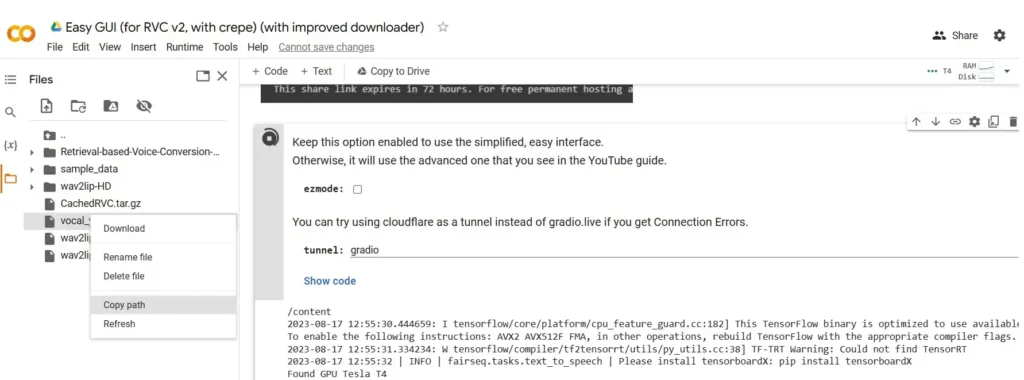
a. Execute Step 1, Step 2, and Step 3 in the Google Colab file. Make sure to turn off “ezmode” as specified (See below screenshot)
b. Upon successful execution, you’ll receive a URL similar to this: `https://9894xxxxx91efe3bfa5.gradio.live`.(See below screenshot). Open the same URL in new window.
Step 5: Configuring the Interface for Voice Cloning
To ensure accurate and pleasing results, make sure to enter following values in GUI:
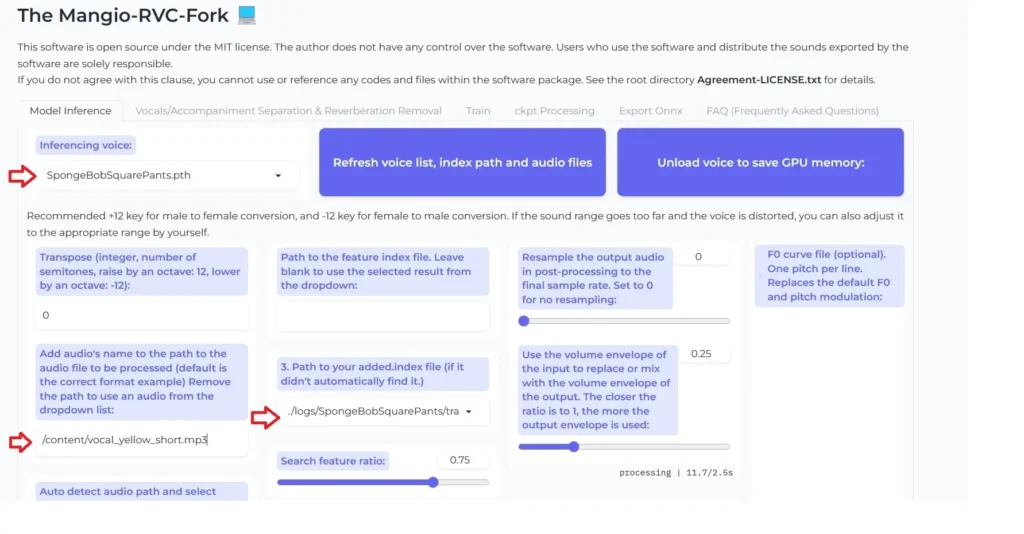
a. Choose the desired voice model from the dropdown menu under “Inferencing Voice.”
b. Specify the path to the vocal file you uploaded in Step 3 under “Add audio’s name to the path to the audio file to be processed”. You can copy path via file manager(See below screenshot)
c. Select the appropriate index file for the chosen model from the dropdown list under “Path to your added.index file”
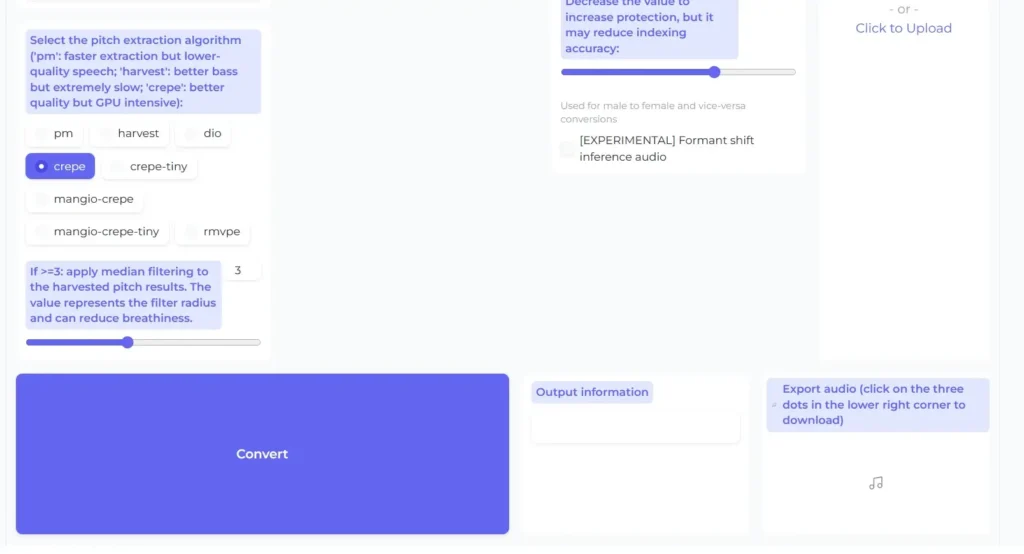
d. For pitch extraction, opt for the “crepe” algorithm under “Select the pitch extraction algorithm”
Step 6: Converting and Creating Your Song Cover
The moment you’ve been waiting for is here. It’s time to clone the voice and create your mesmerizing song cover:
a. After configuring the interface, click on the “Convert” button.
b. The AI-powered system will process the input and generate the cloned voice.
c. Enjoy the delightful outcome—a cloned voice singing the vocals of your chosen song!
Conclusion
AI voice cloning opens up a world of possibilities for artistic expression, enabling you to recreate vocals and produce captivating song covers like never before. By following this comprehensive tutorial, you’ve learned how to leverage Google Colab and a pre-trained voice model to create your own unique renditions of songs.
Diwakar Loomba is the founder of AIHelperHub and a veteran digital strategist with over 10 years of experience in data driven performance and growth marketing.
Diwakar leveraged advanced SEO strategies along with AI and python to enhance user experience, boost conversion rates, and amplify brand awareness across diverse online businesses, including IT/ITeS, E-commerce, Telecommunications, Automobile and other B2B & B2C businesses.

