Last Updated on September 19, 2025
Karaoke is a beloved pastime that allows people to unleash their inner singers and perform their favorite tunes. However, finding high-quality instrumental tracks or karaoke versions of songs can be challenging. Fortunately, with the power of artificial intelligence and the accessibility of Google Colab, you can now create your own karaoke versions of songs by separating the vocals from the instrumental accompaniment. In this step-by-step tutorial, we’ll explore how to leverage the Robust Voice Codec (RVC) model on Google Colab’s free cloud computing platform to separate the vocals from any audio track, empowering you to create personalized karaoke experiences right from the comfort of your browser.
Step by Step Tutorial
Step 1: Setting Up Google Colab
Google Colab provides a powerful and convenient platform for running Python code, particularly when working with AI models. Follow these steps to set up your environment:
Create a free Google account if you don’t already have one and open the the Google Colab file
Step 2: Install dependencies
Then we need to install required dependencies, it will take some time. Sometimes, it can throw error like runtime got disconnected due to XYZ reason. Don’t worry just ignore the message and run the code again.

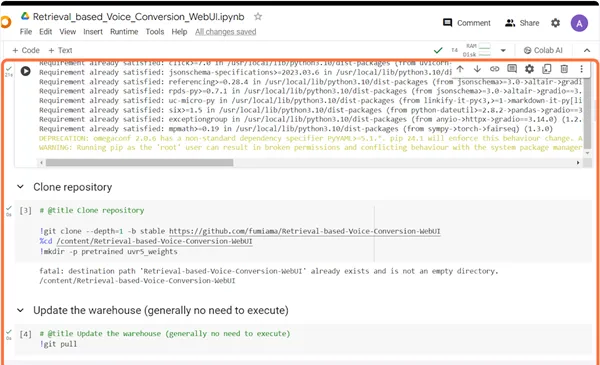
Step 3: Clone repository
Then run the code for clone repository, this will clone the required framework to your account.
Step 4: Install aria2 utility
After cloning the repository, we need to install the aria2 utility, which is a lightweight command-line tool for downloading files. This utility will help us download the required model files efficiently.

Step 5: Download the base model and vocal separation model
Now that we have aria2 installed, we can proceed to download the base model and vocal separation model required for the vocal separation process. These models are essential components that will enable us to separate the vocals from the instrumental accompaniment in any audio file.

Step 6: Download hubert_base
In addition to the base model and vocal separation model, we need to download another important component called hubert_base. This model is responsible for transcribing the audio into a sequence of text representations, which is a crucial step in the vocal separation process.

Step 8: Mount Google Cloud Drive
Mount your google drive where you need to place your mp3 file to separate vocals from background music. Give all of the permissions for same.

Step 9: Start the Web App
Thats it. After this start the web app, it will give you 2 links – one local and one public URL. You need to open public URL, it will open a web based UI where you can create your karaoke version.


Step 10: Specify the input/output folder path and model
Now that you have all the necessary models downloaded, it’s time to separate the vocals from the instrumental accompaniment in your audio files. Navigate to the “Accompaniment and Vocal Separation” tab in the web interface.
In this tab, you’ll need to provide the following information:
- Input Folder: This is the folder containing the audio files you want to separate. To specify this folder, go back to your Google Colab notebook and locate the folder on your Google Drive where you’ve uploaded the MP3 files. Right-click on the folder and select “Copy Path”. Paste this path into the “Input Folder” field in the web interface.
- Output Folder (Vocals): This is where the separated vocal tracks will be saved. Keep it same as Input folder.
- Output Folder (Instruments): This is where the separated instrumental tracks will be saved. Keep it same as Input folder.
- Model: From the dropdown menu, select the “HP5” model. This is the vocal separation model we downloaded earlier, and it will be used to separate the vocals from the instrumental accompaniment.

Once you’ve provided all the necessary information, click the “Convert” button. This will initiate the vocal separation process, which may take some time depending on the number and duration of the audio files you’re processing.
After the process is complete, you’ll find two new files in the specified output folders: one containing the separated vocal track and another containing the separated instrumental track. These files will have the same name as the original audio file, but with the appropriate suffix.

Congratulations! You’ve successfully separated the vocals from the instrumental accompaniment in your audio files. You can now use the separated vocal tracks to create your own karaoke versions or for other creative purposes.
He has helped brands/enterprices across IT/ITeS, E-commerce, Telecommunications, and Automotive sectors enhance visibility, user experience, and conversion rates through advanced SEO strategies along with AI and python to enhance user experience, boost conversion rates, and amplify brand awareness.
Driven by a passion for innovation, he focuses on leveraging emerging technologies to revolutionize SEO and content performance.
- Top AI Marketing Tools in 2026 - December 2, 2025
- Best SEO Content Optimization Tools - November 13, 2025
- People Also Search For (PASF): The Complete 2025 Guide to Smarter SEO Optimization - November 11, 2025